Fitting and removing agricultural tyres
Step-by-step guide to tyre fitting and removal
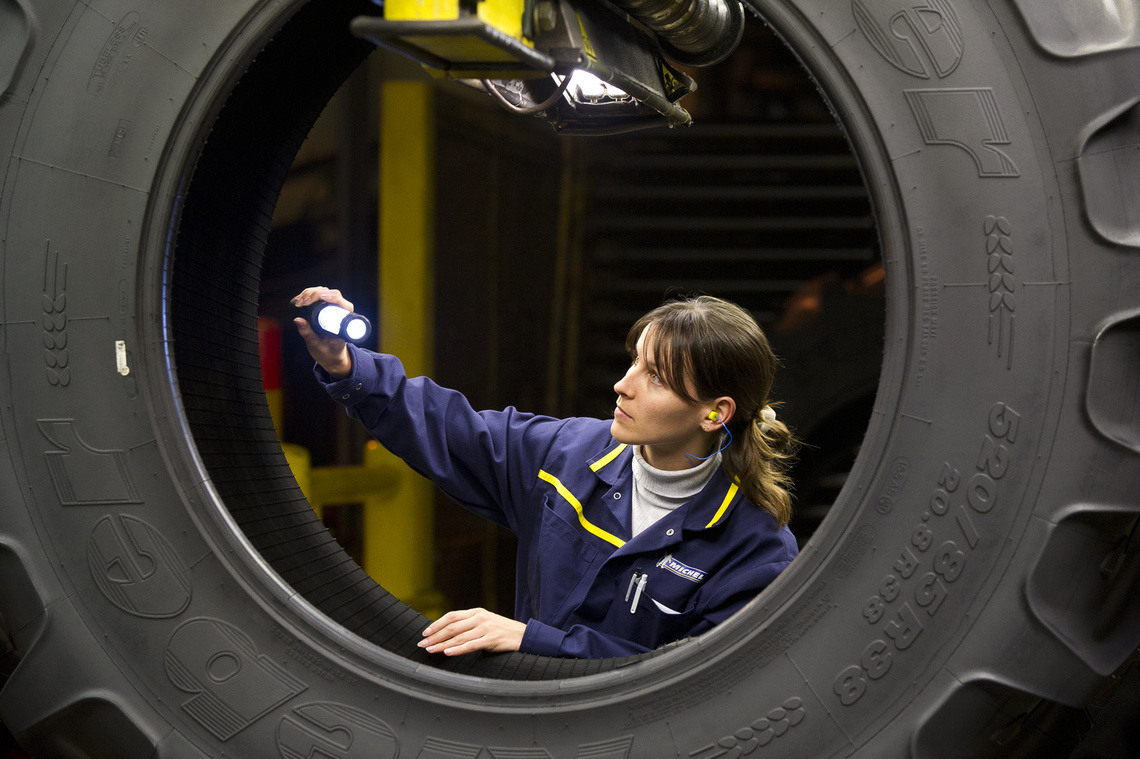
Tyre fitting and removal operations should always be carried out by a trained and qualified fitter using the appropriate tools and methods of work. It should never be carried out by a trainee working alone and if several people are involved in the work (in the case of fitting high volume tyres), make sure that at least one person is present throughout the whole process. Always use a compressed air circuit fitted with a pressure regulator. Failure to comply with these methods and instructions may result in the tyre being incorrectly fitted on the rim and may cause the tyre to burst with the consequent risk of serious or even fatal injury.
Removing the tyre from the rim
1) Never try to unseat the beads of an inflated tyre.
2) Always remove the valve core.
- Before unseating, check that the tyre is completely deflated,
- Never use tools that could damage the sidewalls or the beads of the tyre,
- Unseat the beads starting from the tyre removal slots if the tyre is equipped with them,
- To make the tyre easier to remove and protect the beads, particularly in case of a puncture, lubricate the rim seats and the tyre beads as you progress,
- It the rim shows visible damage, the tyre should be deflated before the wheel is removed
montage carrousel article agri
Preparation for fitting
1) Before fitting, make sure that the rim, the tyre and the tube are compatible.
Check that:
- The tyre is suitable for the vehicle or machine
- The seat diameter of the rim is exactly the same as the seat diameter of the tyre to be fitted. For example: 18.4R30 tyre. Rim:DW16L x 30
- Fitting the tyre on this rim is authorized (see characteristics in manufacturer’s literature)
Caution: Some rims have a seat diameter of 15.3”; never fit 15” tyres on these. Similarly, never try to fit 16” tyres on 16.1” and 16.5” diameter rims.
2) Before fitting the tyre on a rim that has previously been in service:
- The rim must be clean and in good condition (not damaged in any way),
- If necessary, clean the rim thoroughly with a wire brush. Never fit a tyre on to a rim shows cracks, corrosion, pitting, significant distortion, evidence of a welded repair and excessive flange wear.
3) If the tyre is part worn, it needs to be carefully examined inside as well as outside in order to identify any damage which may be present.
If it shows signs of deterioration or damage deemed by a specialist to be beyond repair, scrap the tyre.
4) If fitting with a tube, always use the correct sized tube for the tyre (tyre size marked on tubes).
Never fit an inner tube in a damaged or repaired rim, or in a rim finished in such a way that a tube should not be fitted.
When fitting tubeless tyres on tubeless rims without a tube, always use a new tubeless valve.
5) Always use tools in good condition (not sharp) and suitable for the tyres and rims ( bead unseating tool, tyre lever, machine foot).
In the case of wide or large volume tyres, we recommend the use of a hydraulic or mechanical bead unseating tool to assist with fitting of the second bead.
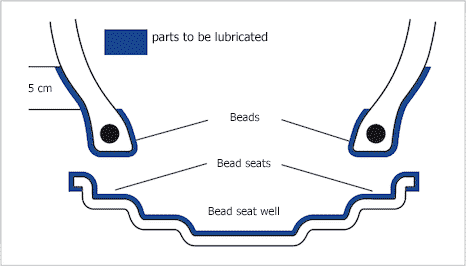
Before fitting, lubricate the rim and the tyre beads. Apply a thin layer of lubricant on the parts identified in the diagram. On the outside of the beads, the lubricant must extend 5cm above the rim flange
You should only use products suited to this purpose which will not damage the tyre (do not use products based on hydrocarbons, silicones, anti-freeze, etc.)
removing the tire
Vertical fitting of the tyre on the rim
1) Position the valve or valve hole at the bottom.
2) If there is a valve symbol on the sidewall of the tyre, position the tyre so that the symbol is as close as possible to the valve or the valve hole in the rim.
3) Fit the tyre on the rim so that the first bead positions itself against the rim flange. If applicable, observe the correct direction of rotation indicated on the tyre by an arrow.
4) Using a suitable lever and by repeated applications every 10cm:
-
Engage the first bead over the rim flange.
When the first bead is in place:
- Position the slightly inflated tube inside the tyre (when fitting with an inner tube),
- Secure the valve, by slightly tightening the rim nut.
For the second bead:
- Lever it progressively over the rim flange,
- Finish at the valve.
5) Tyre centring, seating the beads
- Lower the jack slightly to support and centre the tyre,
- Remove the valve core,
- Inflate slowly to begin seating the beads,
- Ensure that the beads do not pinch the tube,
- Inflate to a maximum of 2.5 bar to ensure beads are seated correctly.
Inspection Kleber Agricole verticale
Inflation and seating of the beads
1) Follow the safety rules:
- Containment for the tyre assembly (safety cage if possible),
- Safety glasses,
- Safety shoes,
- Ear defenders.
If there is no safety cage or bar available, the operator must stand as far away as possible from the tyre and rim.
Caution: always stay out of the trajectory areas to avoid any risk of physical injury in case of an accident.
To maximise safety conditions, use an inflator with a calibrated pressure gauge, connected to the valve by an air extension tube at least 3 metres long, equipped with a clip-on air chuck on the valve side and in good working order (never lock the inflator handle).
2) In particular make sure that:
- The beads are correctly seated and centred in relation to the rim flange, inflate to a maximum of 2.5 bar when seating the beads.
-
If the beads are not correctly seated:
- Deflate, lubricate again and inflate to a pressure of 2.5 bar,
- Repeat these operations as many times as necessary until the beads are seated correctly.
-
Once all of the preceding operations have been carried out:
- Refit the valve core,
-
In the case of horizontal fitting (we do not recommend this, as it is impossible to see if the lower bead is correctly seated), we advise the following additional precautions:
- Initially, do not exceed a maximum pressure of 0.7 bar (to obtain an airtight seal)
- The tyre and rim unit must be lifted up and placed in a safety cage or, failing this, lean the upper part against a wall; Never use a door or a light-weight partition,
- Obey the inflation instructions relating to vertical fitting.
- Tighten the valve rim nut by hand,
- Reduce the operating pressure to that for the operation, according to the load tables shown in the manufacturer’s literature for load and speed use,
- Refit the valve cap every time a tyre is inflated or it’s pressure is checked, as this part alone ensures that the valve remains clean and airtight.
Note:
All radial tyres used at low inflation pressure must be fitted to serviceable rims.
Before tyres go into service
- When transporting machines (by road, rail or sea), we recommend inflating the tyres to 1.8 bar (26 PSI) to avoid any possible damage caused by certain anchoring systems.
- When the machine is put into service, it is essential that they tyre pressures are correctly set to suit the load carried by the tyre and the actual conditions of use. (See load/pressure tables).
Special case
Liquid ballasting
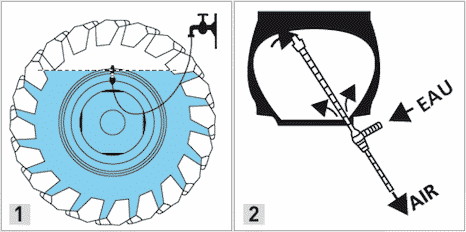
In some special cases, if you want to increase the static vehicle weight or lower the centre of gravity of the machine, both with tubeless and standard tube-type tyres, one solution is to ballast the tyres with liquid.
Agricultural tyre valves are of the “air and water” type, which means that the tyre can be filled to a maximum of 75%(diagram 1) with liquid (water + anti-freeze). Consult our technical literature for filling volumes
In winter, the temperature may fall below 0 degrees; it is essential to use a Glycol-based anti-freeze product which does not damage rubber. Use in accordance with anti-freeze manufacturer’s instructions.
Fill the inner tube or the tubeless tyre with liquid up to the valve (valve placed near the top), letting the air escape at the same time (diagram 2). Inflation and pressure are adjusted by air.
As the volume of air which provides the pressure in the tyre is small (about 25% of the volume), regular pressure checks are essential; we recommend checking the pressure every month.
Inspection pneu Kleber agricole
When liquid-ballasting tubeless tyres:
- Fit the tyre and seat the beads; see method for “Inflating and seating the beads”.
- Deflate the tyre to a low pressure (about 0.5 bar).
- Position the valve at the top.
- Ballast the tyre with liquid(water+anti-freeze) up to a maximum of 75% of the tyre’s volume, while evacuating the air at the same time (diagram 2).
- Finish inflating with air and adjust the pressure.
tubeless1